The creation of a new computation model in Abaqus/CAE usually requires recurring definitions, such as the definition of a material with corresponding section, such as the request for field and history output, such as step definitions, friction properties and much more.
In order not to have to perform repetitive definitions for each new model, you can easily create a plugin with the help of this article. So, corresponding definitions are done at the push of a button. Thus, boring and tedious work can be saved.
The following example shows how to create such a plugin using the RSG Dialog Builder.
RSG Dialog Builder provides a simple means of creating plugins in Abaqus/CAE. Here the RSG Builder consists of two parts, the GUI and the executing script in the kernel of Abaqus/CAE. In this example, the GUI is created manually. For the creation of the script we use the Macro Recorder for the most part. To the RSG Dialog Builder we have another contribution to the automatic generation of screw parts.
If you want to define names or values with the QuickStart plugin, you need a list of possible variables. In the present example, 2 materials with sections, as well as 2 steps with corresponding initial time increments, and outputs for a field and a history plot are to be defined.
This results in the following list of variables
- SN = Material name steel
- ES = Young’s modulus steel
- NueS = steel Poisson’s ratio
- DS = Density steel
- AS = Heat expansion coefficient steel
- SSt = Section name steel
- AN = Material name Aluminum
- EA = Young’s modulus aluminum
- NueA = Poisson’s ratio Aluminum
- DA = Density aluminum
- AA = Heat expansion coefficient aluminum
- SAL = Section name Alu
- SN1 = Name Step 1
- IncS1 = Increment Step 1
- SN2 = Name Step 2
- IncS2 = Increment Step 2
- IP1 = Interaction Property Name
- FR = Friction coefficient for interaction
- FO = Name for Field Output
- HO = Name for History Output
or all variables in one line
- SN,ES,NueS,DS,AS,SSt,AN,EA,NueA,DA,AA,SAL,SN1,IncS1,SN2,IncS2,IP1,FR,FO,HO
The list here serves only as an example.
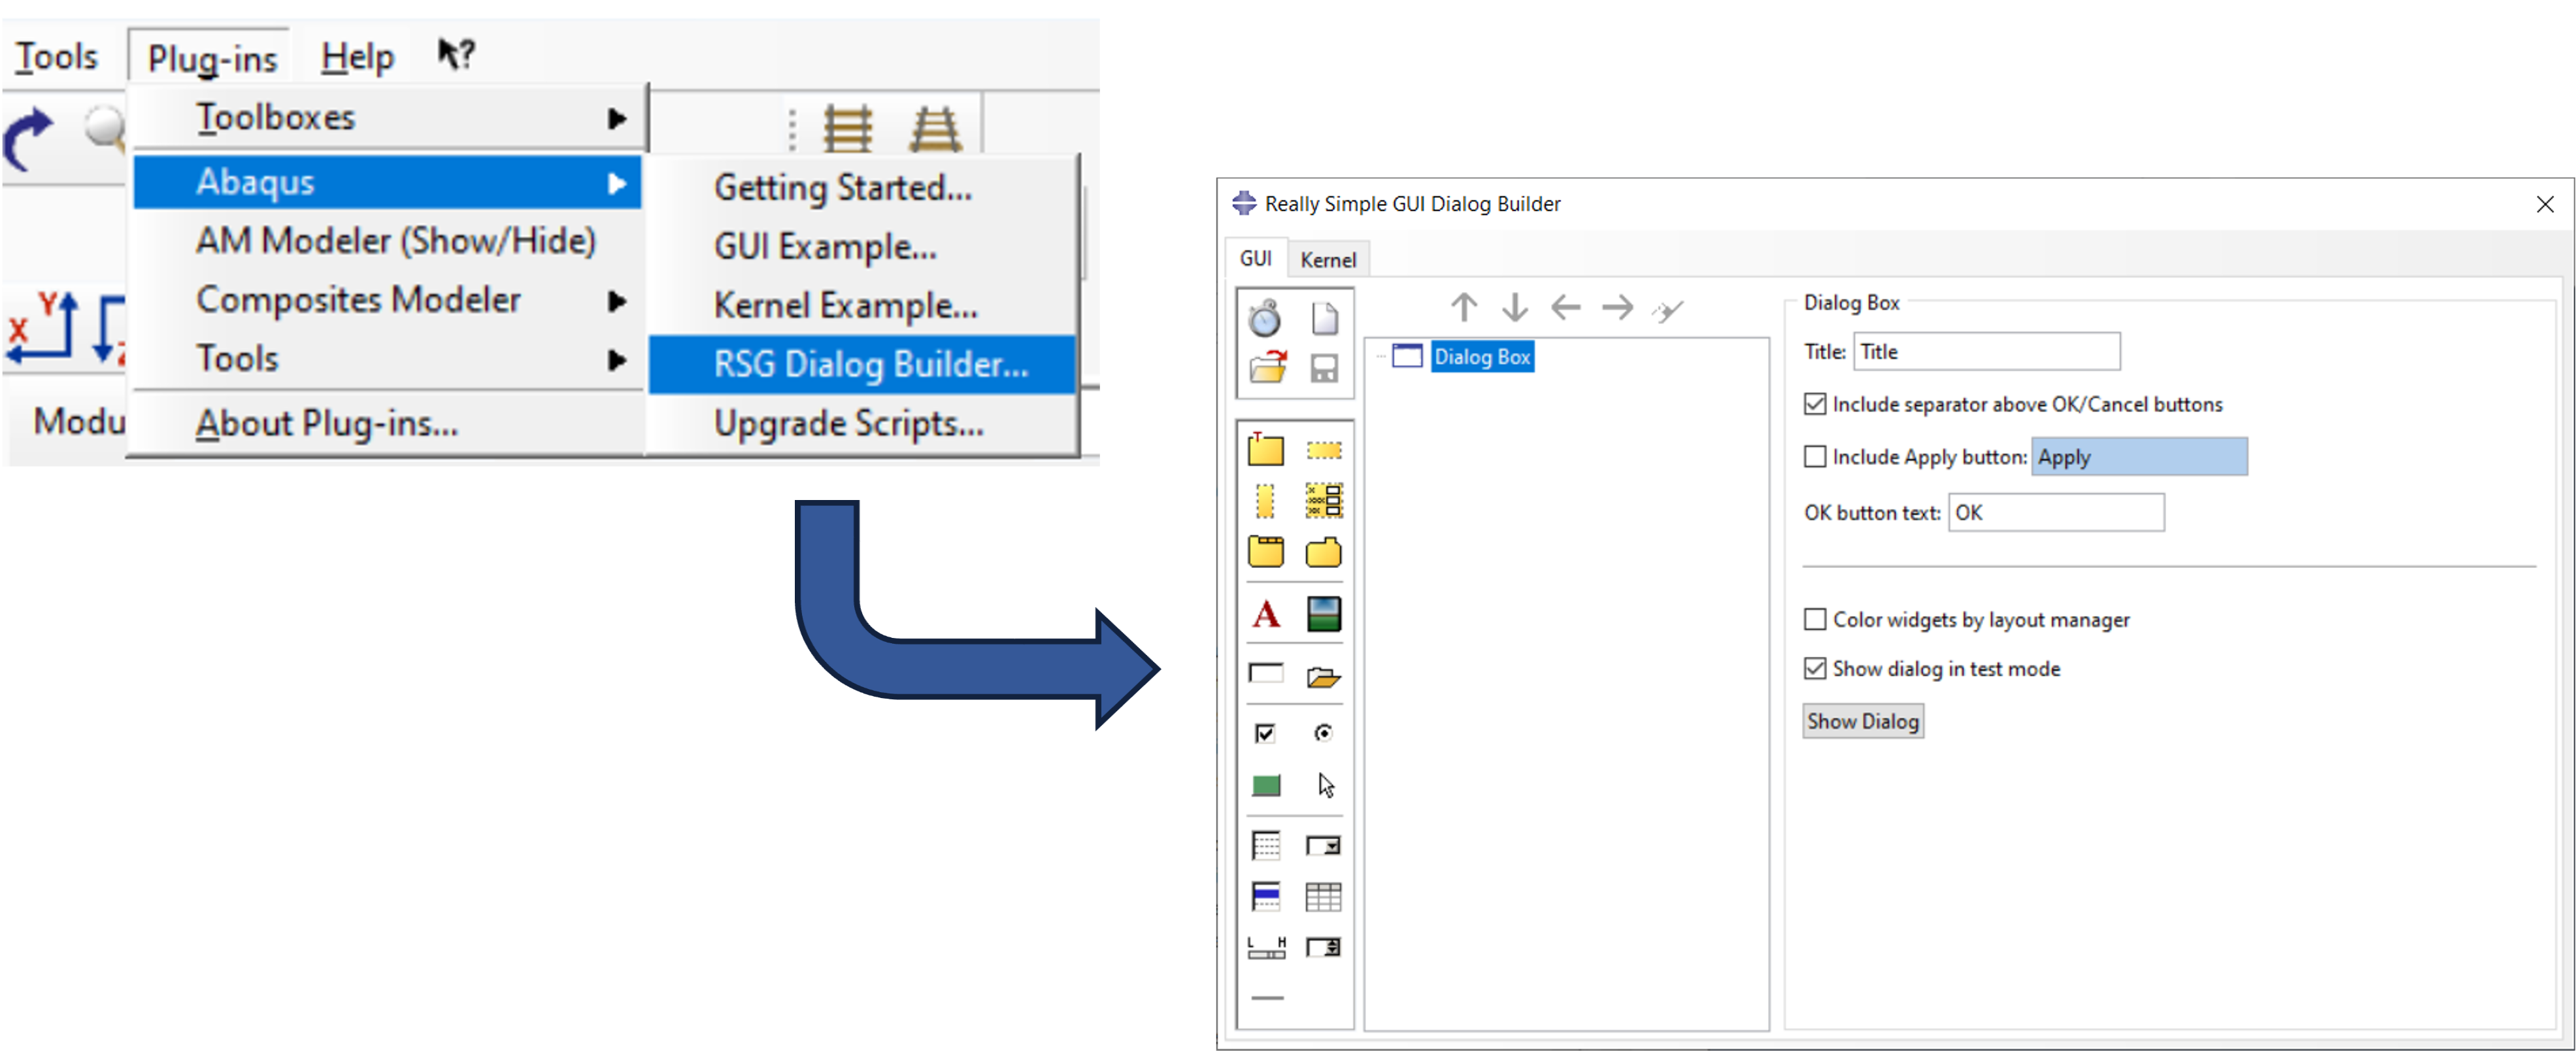
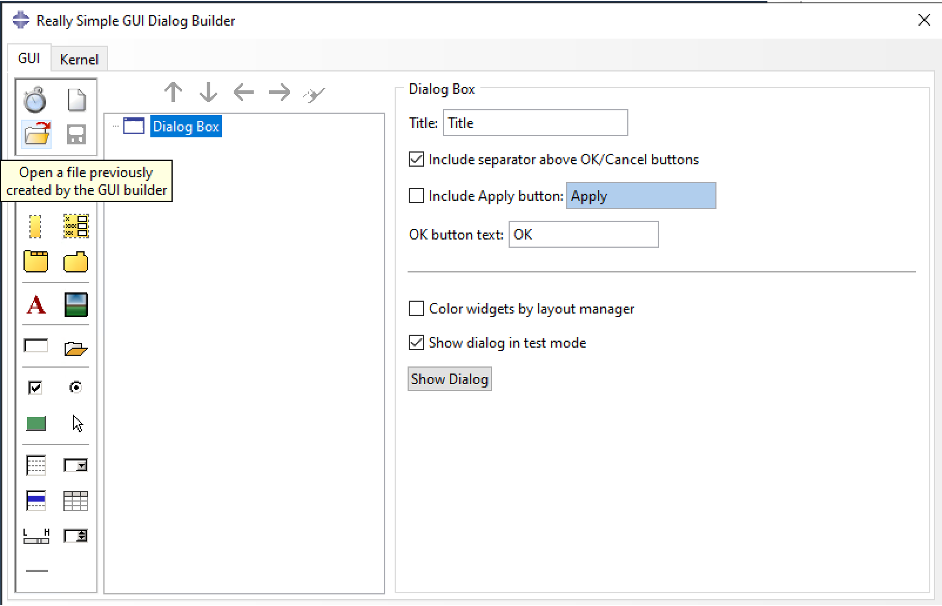
RSG Dialog Builder consists of 2 parts – the GUI and the script to be executed. After opening the RSG Dialog Builder, see picture below left, the GUI is offered under the GUI tab, see picture below right, the definitions of the script under the Kernel tab. In this section we will create the GUI.
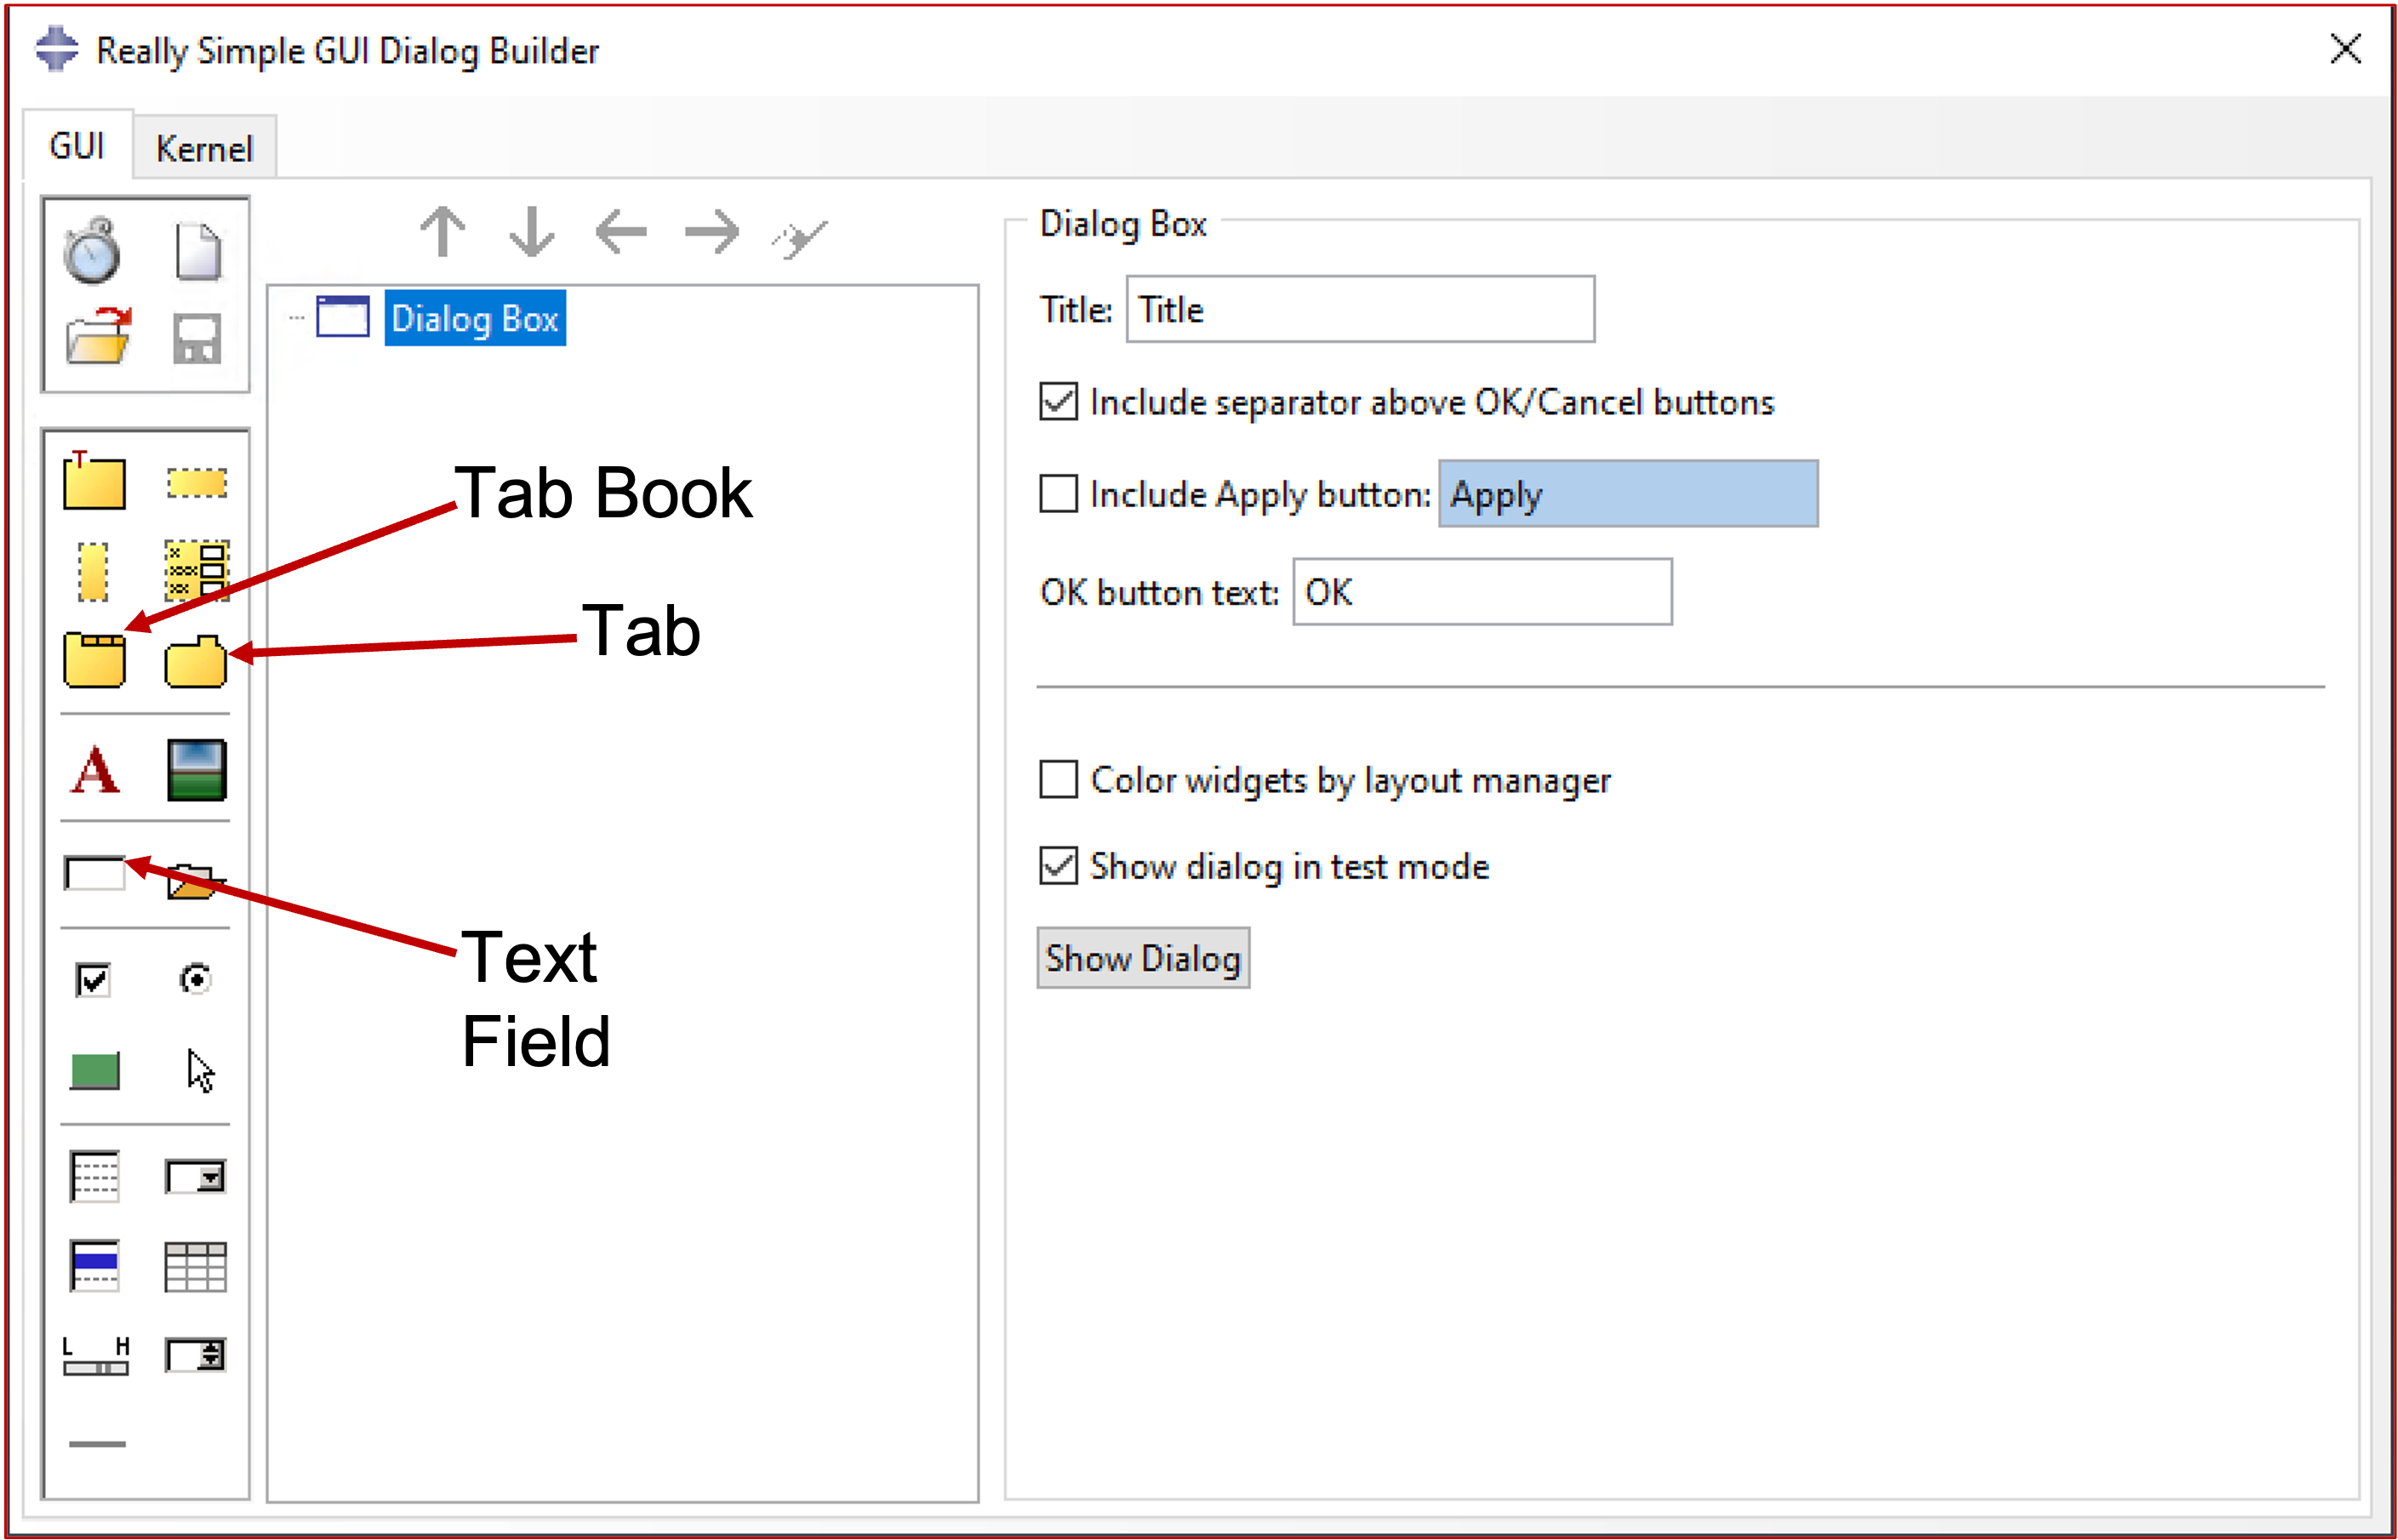
You should define a title for the dialog box. The activated Show dialog in test mode provides a live view of the GUI.
In this example we will work only with the Book tab, the Tab and the Text Field.
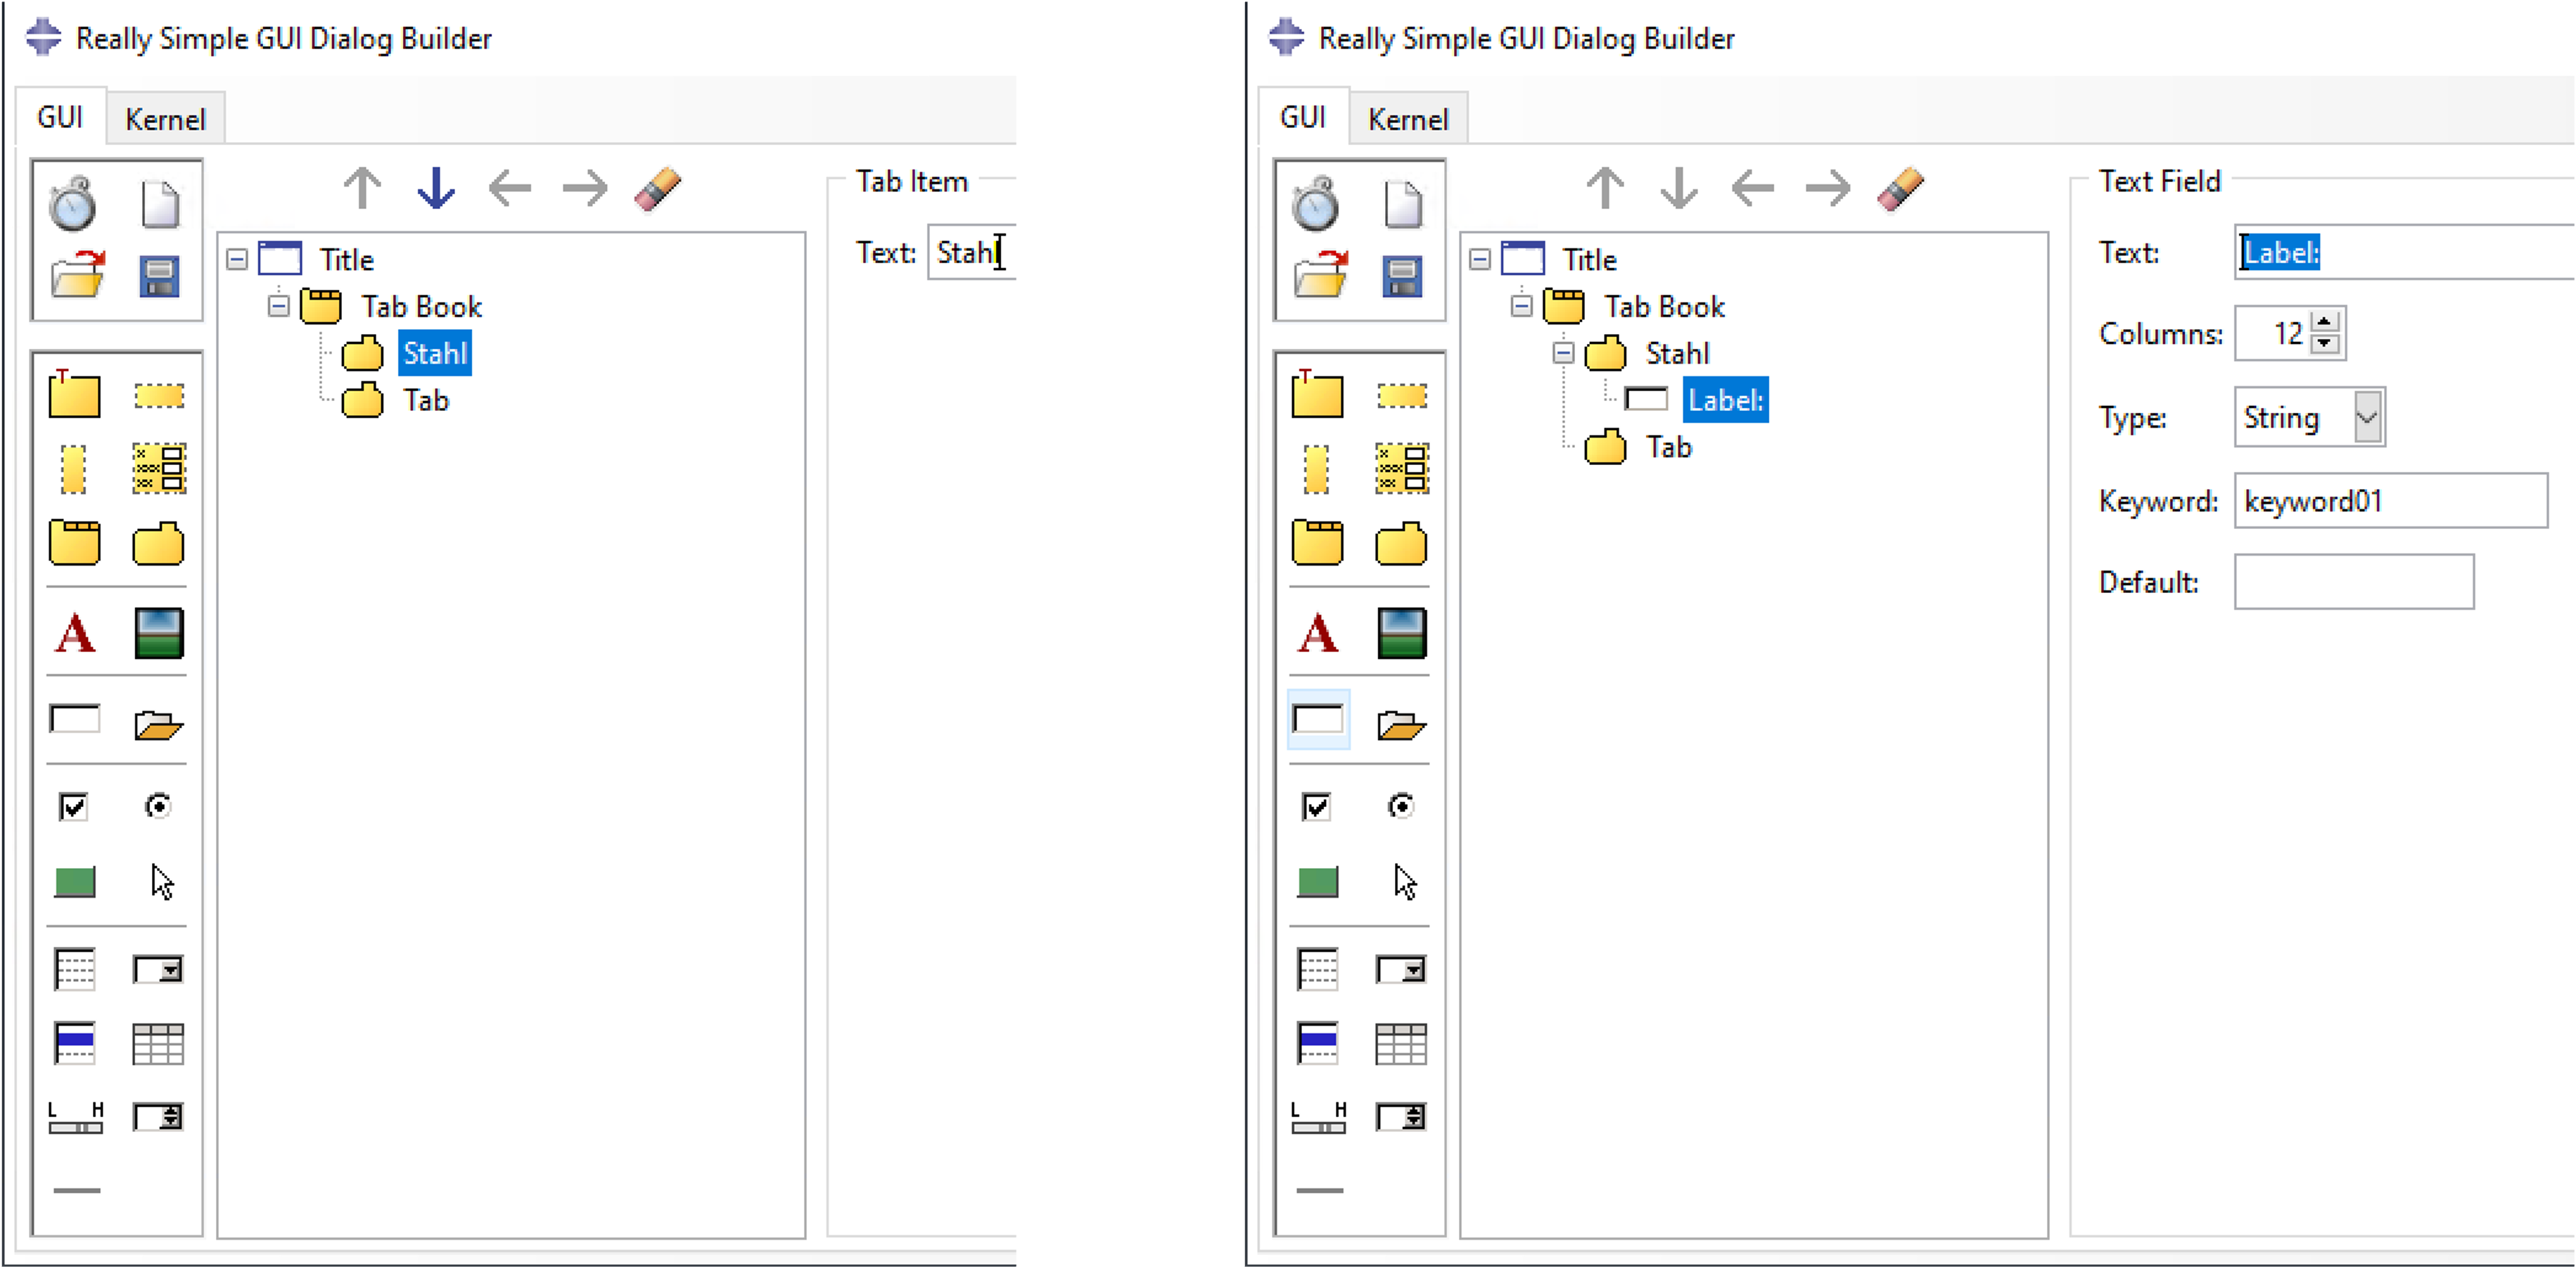
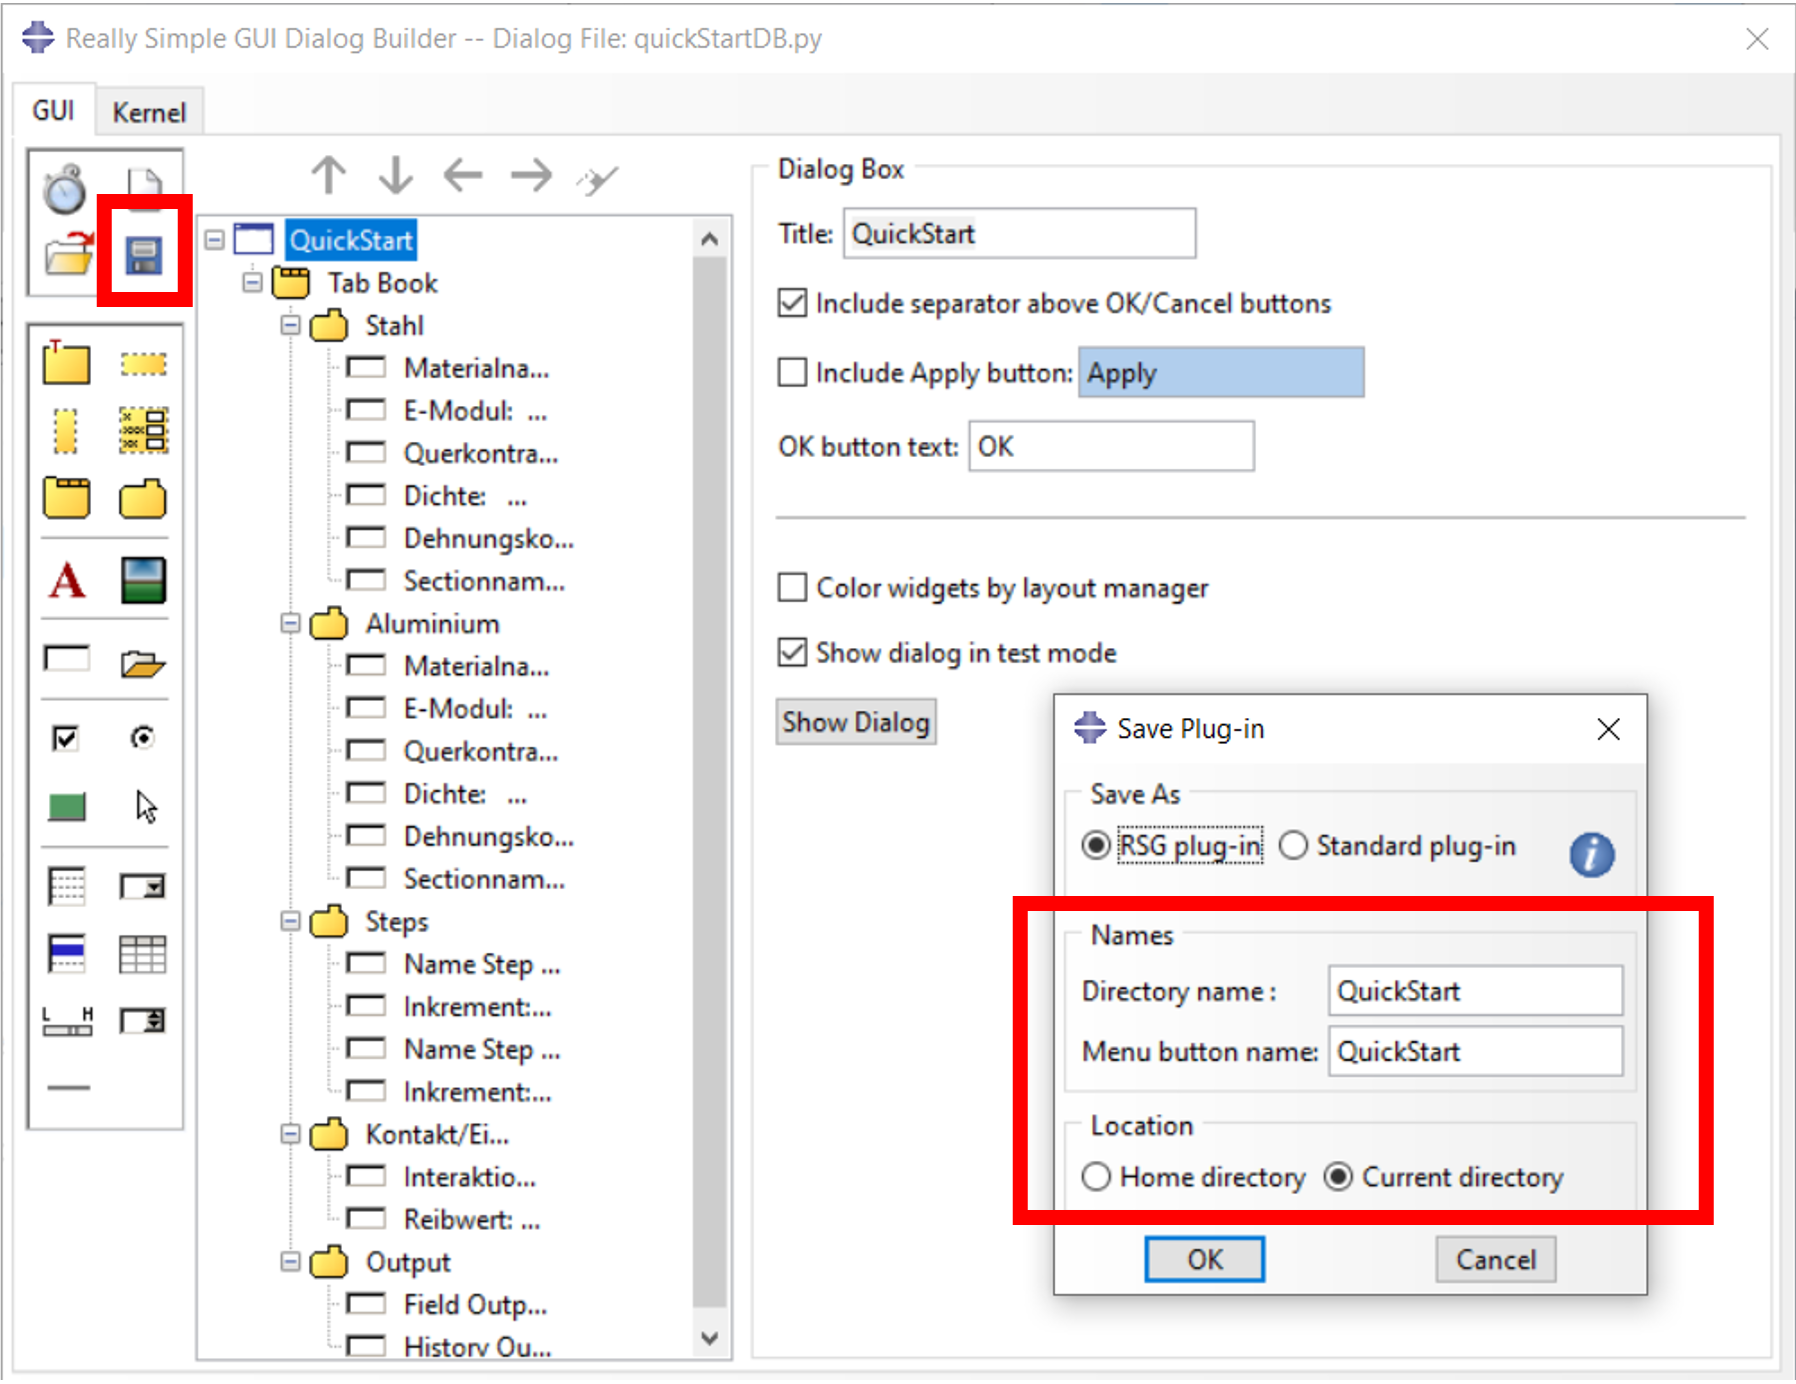
When creating the GUI, we start with a Tab Book in which we want to sort all definitions using tabs. Within a tab we work only with text fields. Here the text corresponds to the above defined description of a variable, the type here to a string for a name or a float for a value, the keyword to the above agreed variables and default to the name or value when calling the plugin. Here you should directly use the correct values and names, because these are permanently stored in the plugin.
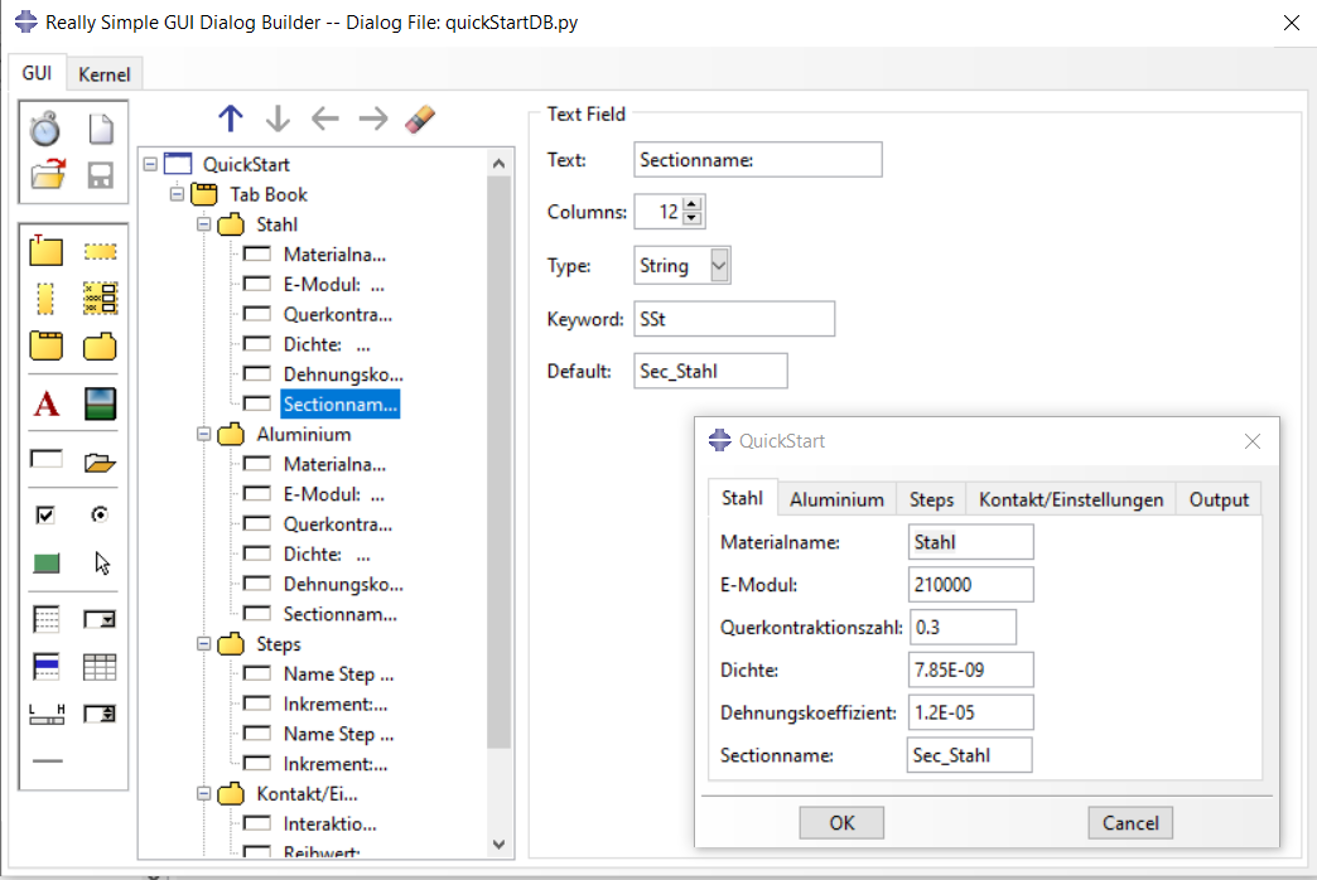
The finished GUI with all inputs will look like this. The tabs provide better clarity.
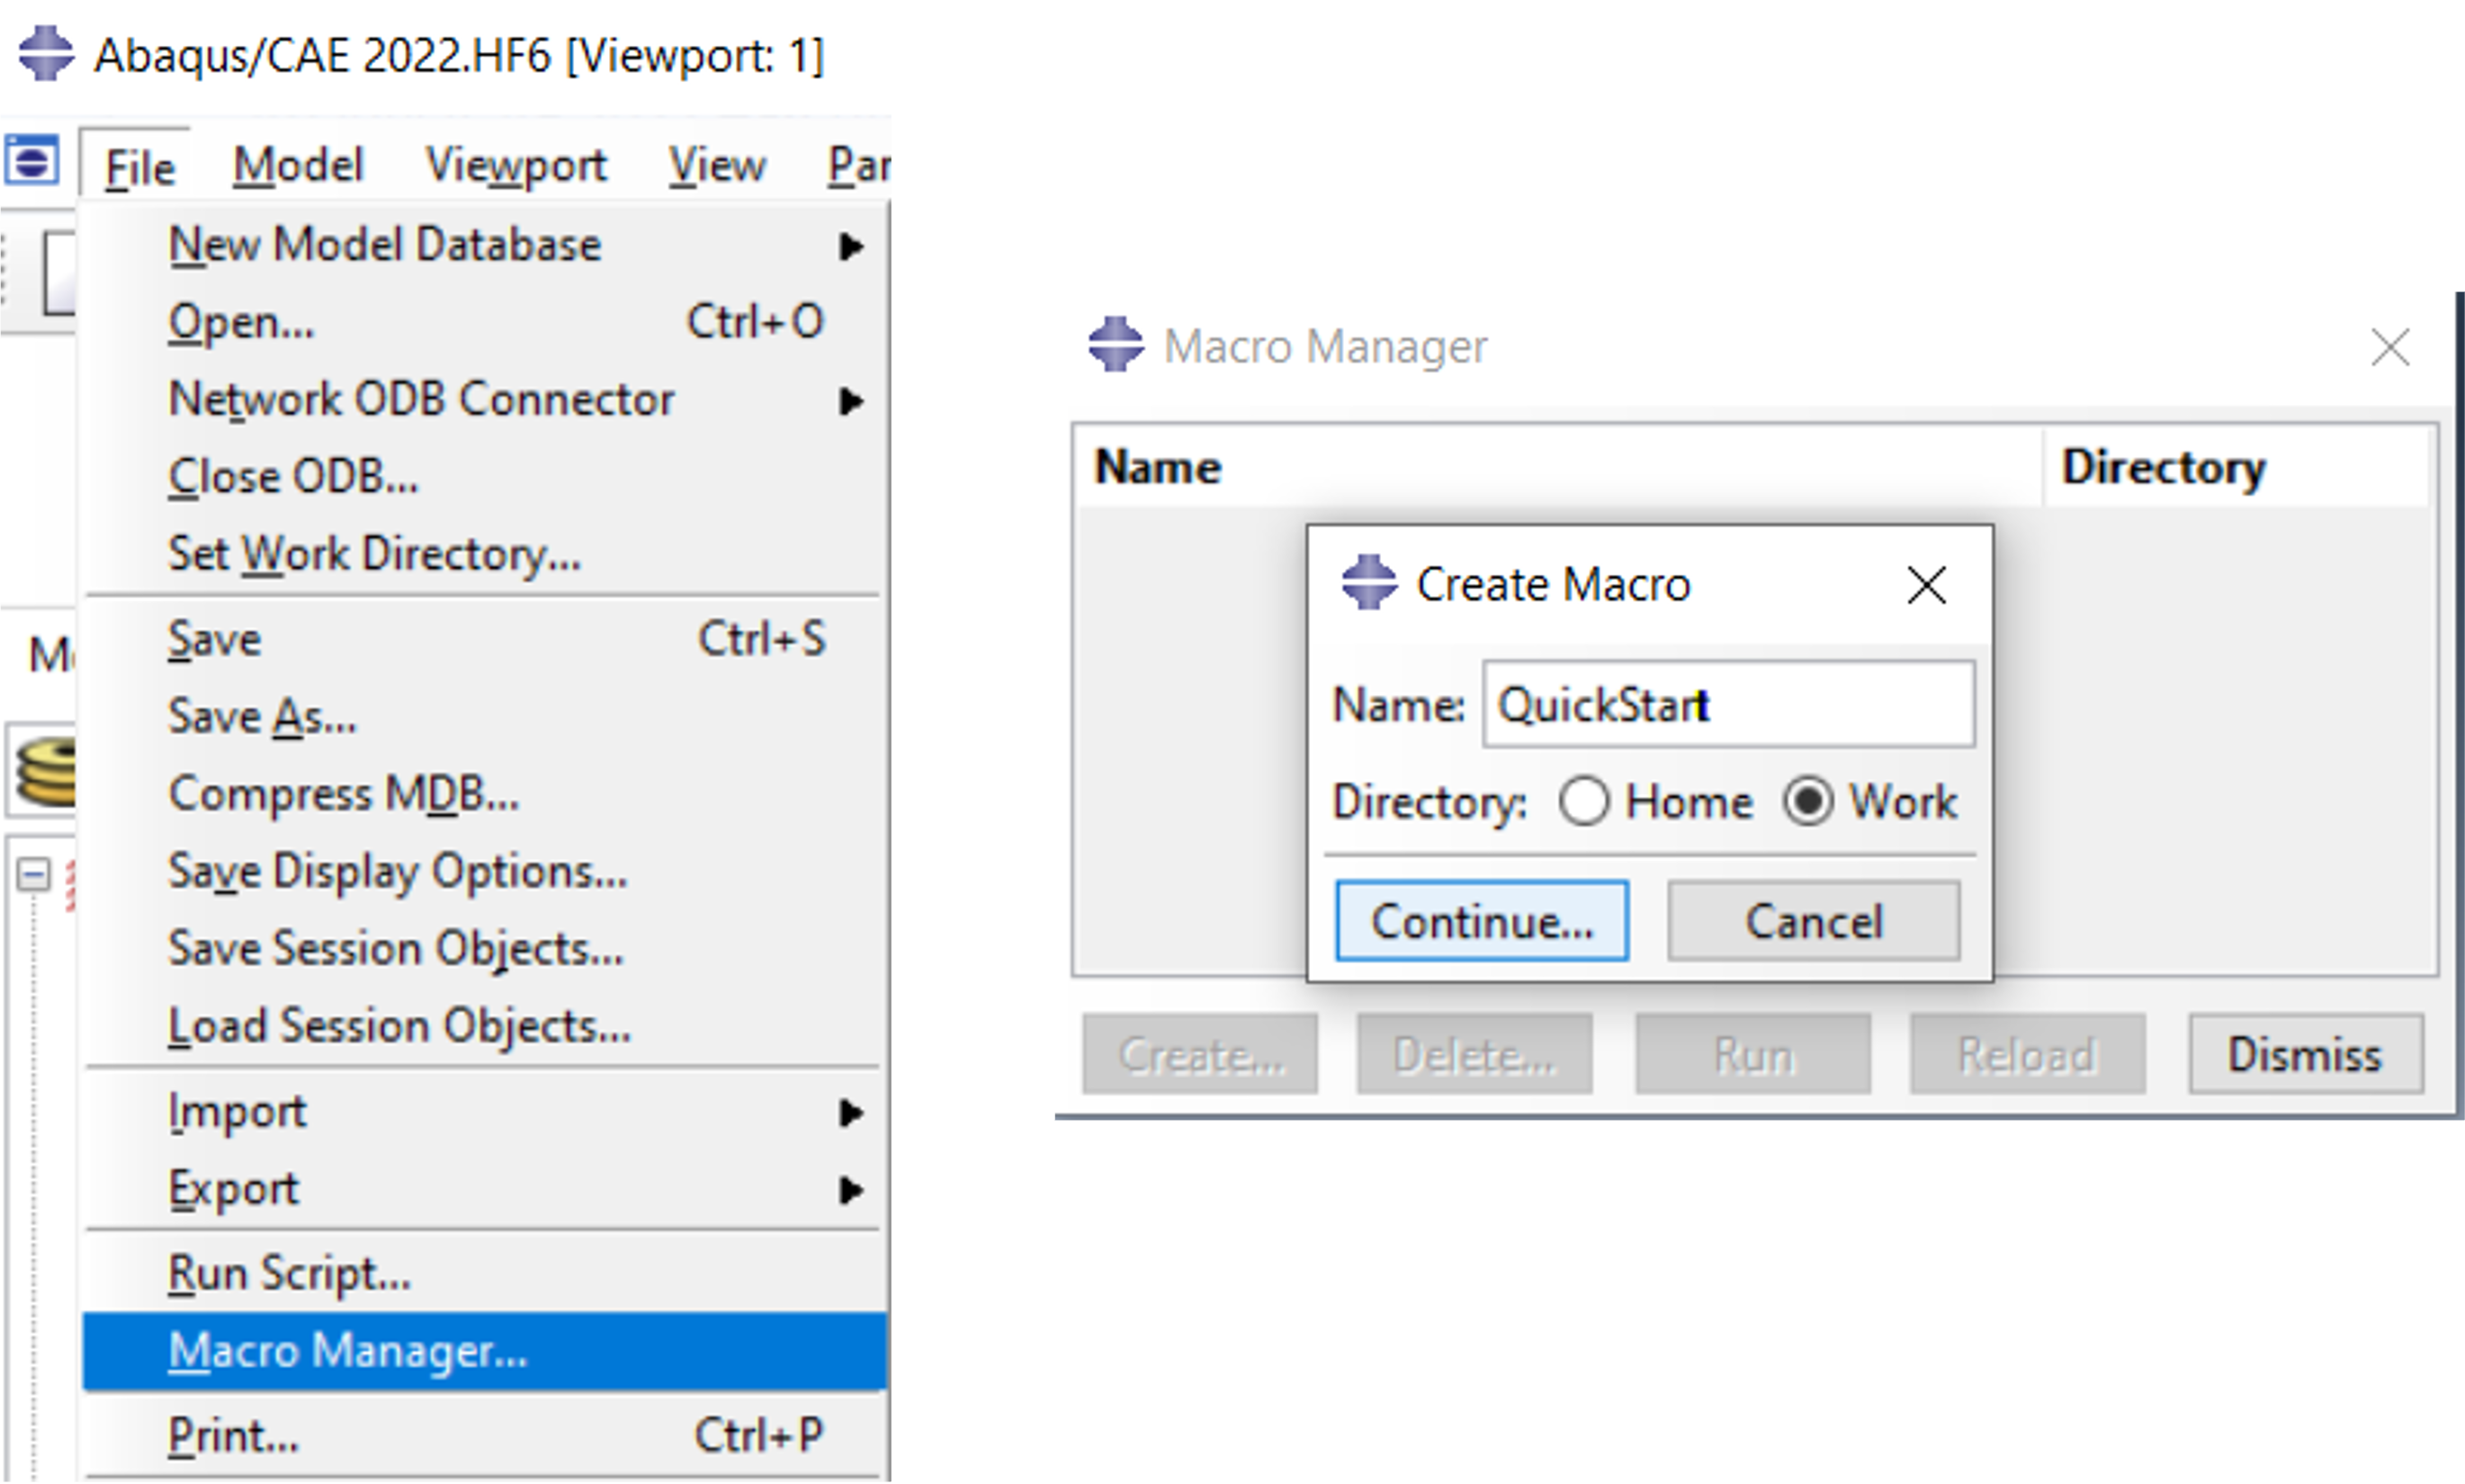
When creating the script we want to use the Macro Recorder. This saves us from studying the Abaqus/CAE customization manuals.
The following work steps are performed:
- Starting Abaqus/CAE with the selection of Create Model Database with Standard/Explicit Model
- Starting the macro recorder
- Definition of the material data (here steel and aluminum) as well as the corresponding sections, definition of the steps, contact settings, field and history output.
- Closing the macro recorder
The macro recorder creates two files in the working directory with the names abaqus1.rec and abaqusMacros.py. The content is accumulated, so it is recommended to delete an existing file of this name so that the content contains only the Python code required for the script.
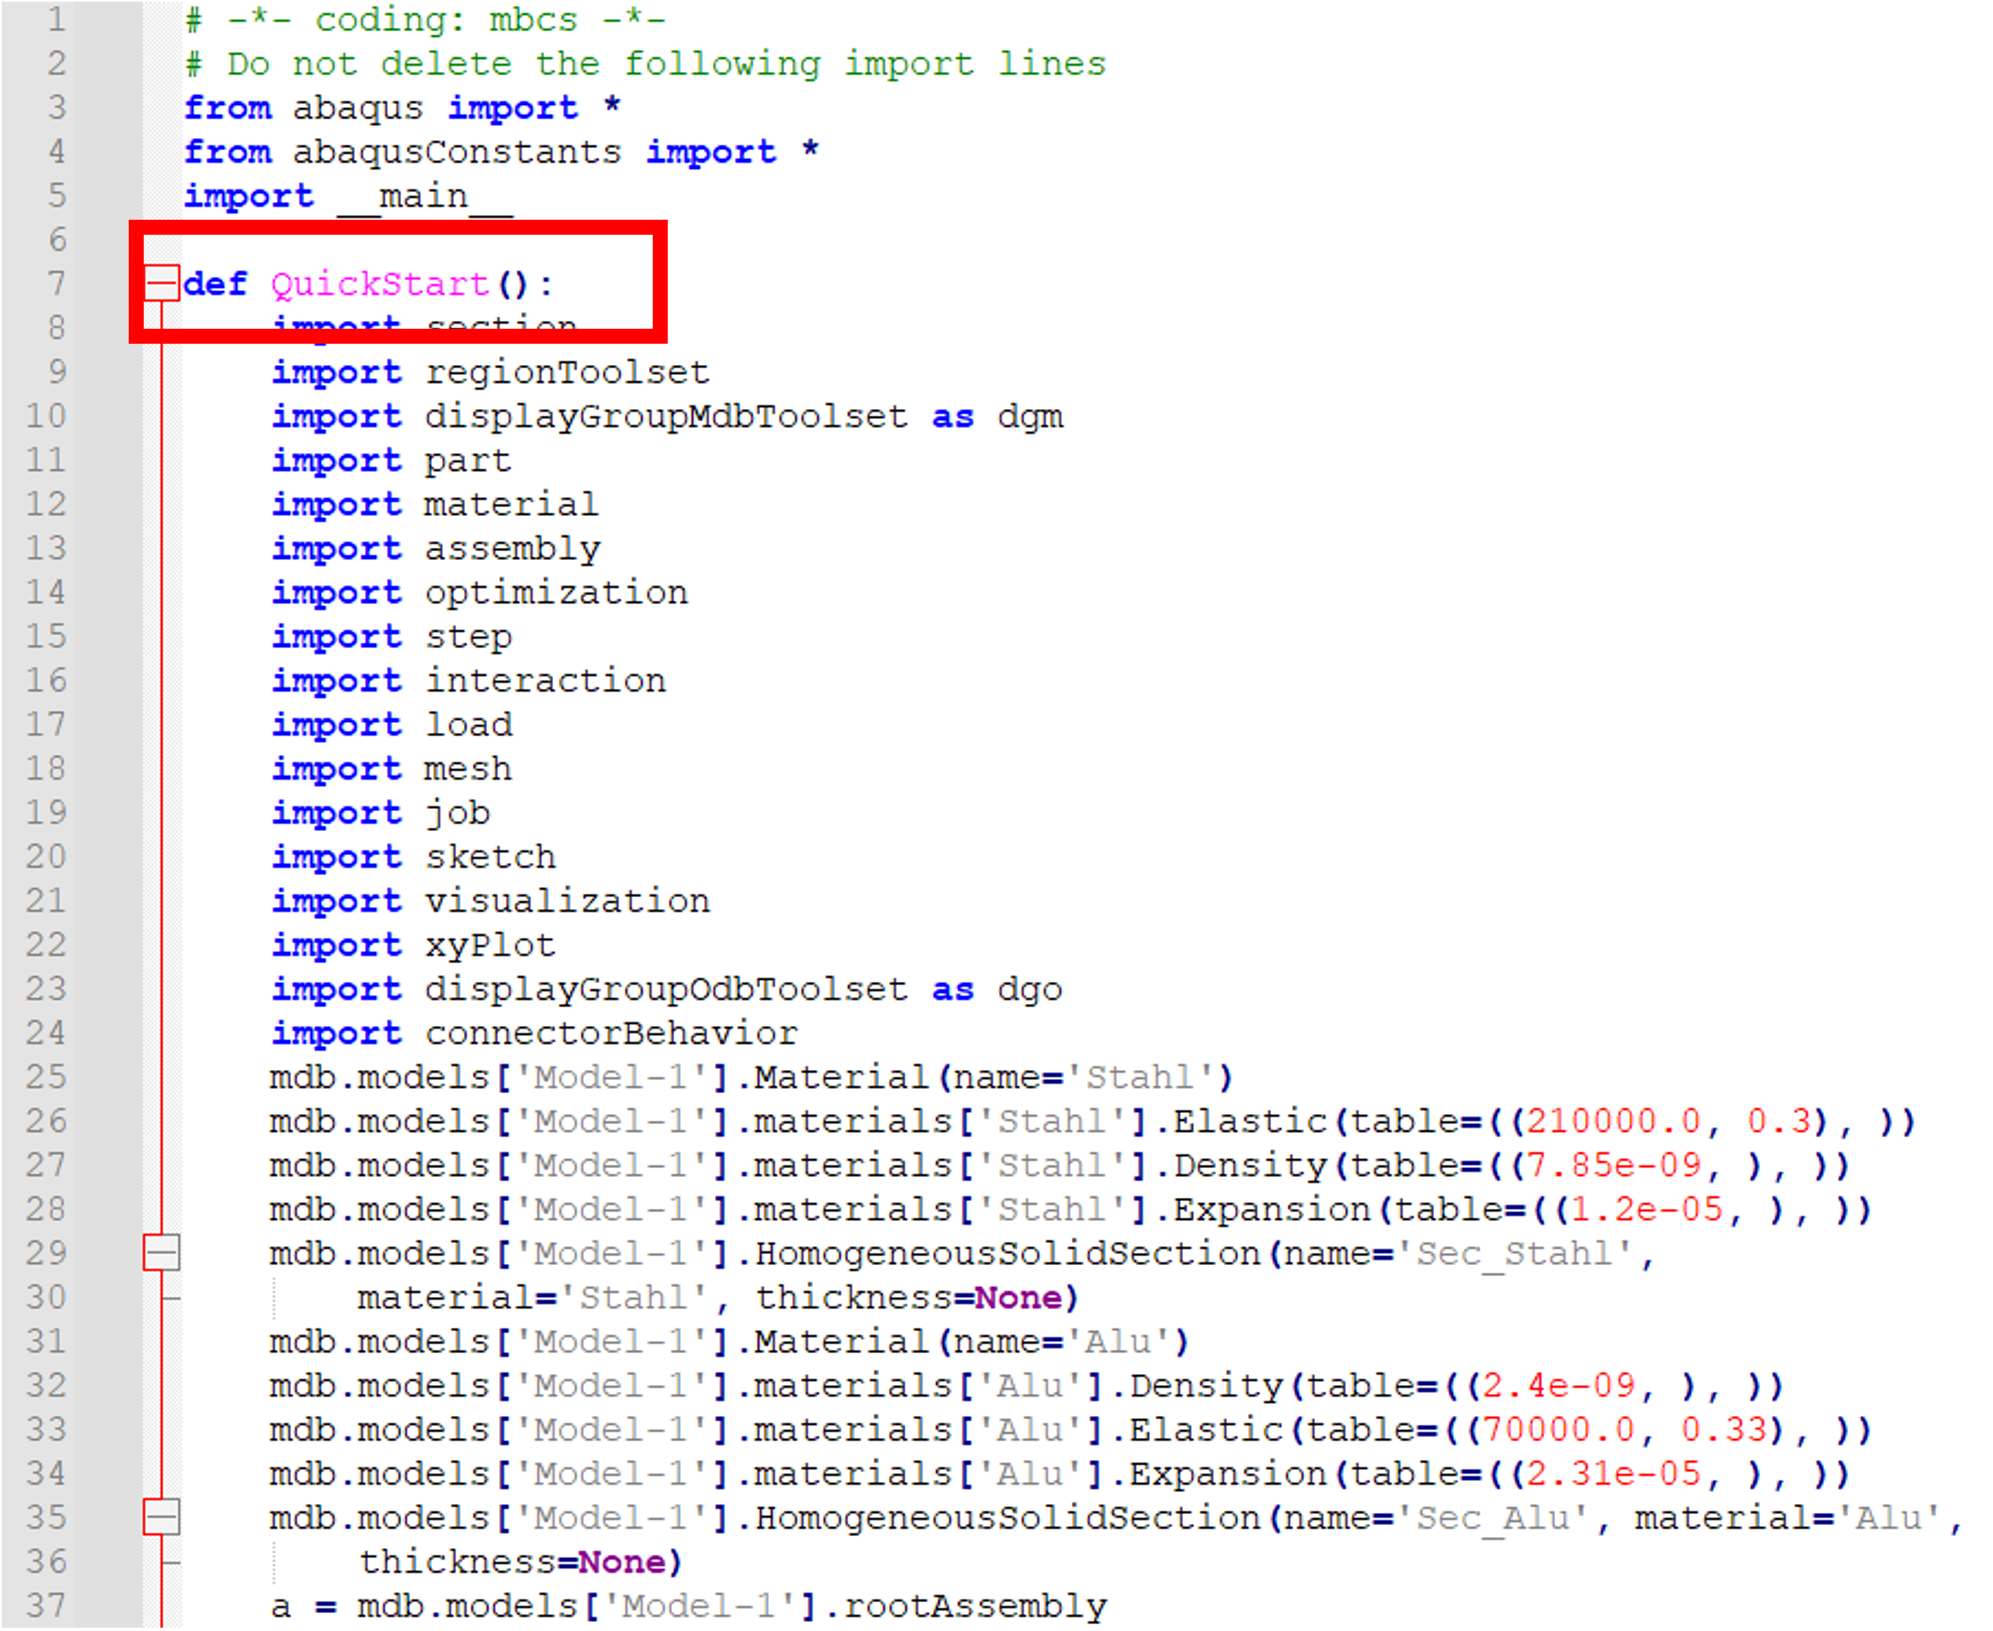
Now the file abaqusMacros.py can be opened with the editor. Here, the editor Notepad++ is used for editing, see [1]. Here, the QuickStart function is defined for the script. It does not yet contain any parameters/keywords and must now be filled. The rest of this block is taken, even if it calls modules that are not needed for the script. It is recommended to save this file under a new name, e.g. QuickStart.py.
When editing the function, some Python, [2], knowledge is helpful. But you can also contact us. We are happy to support.
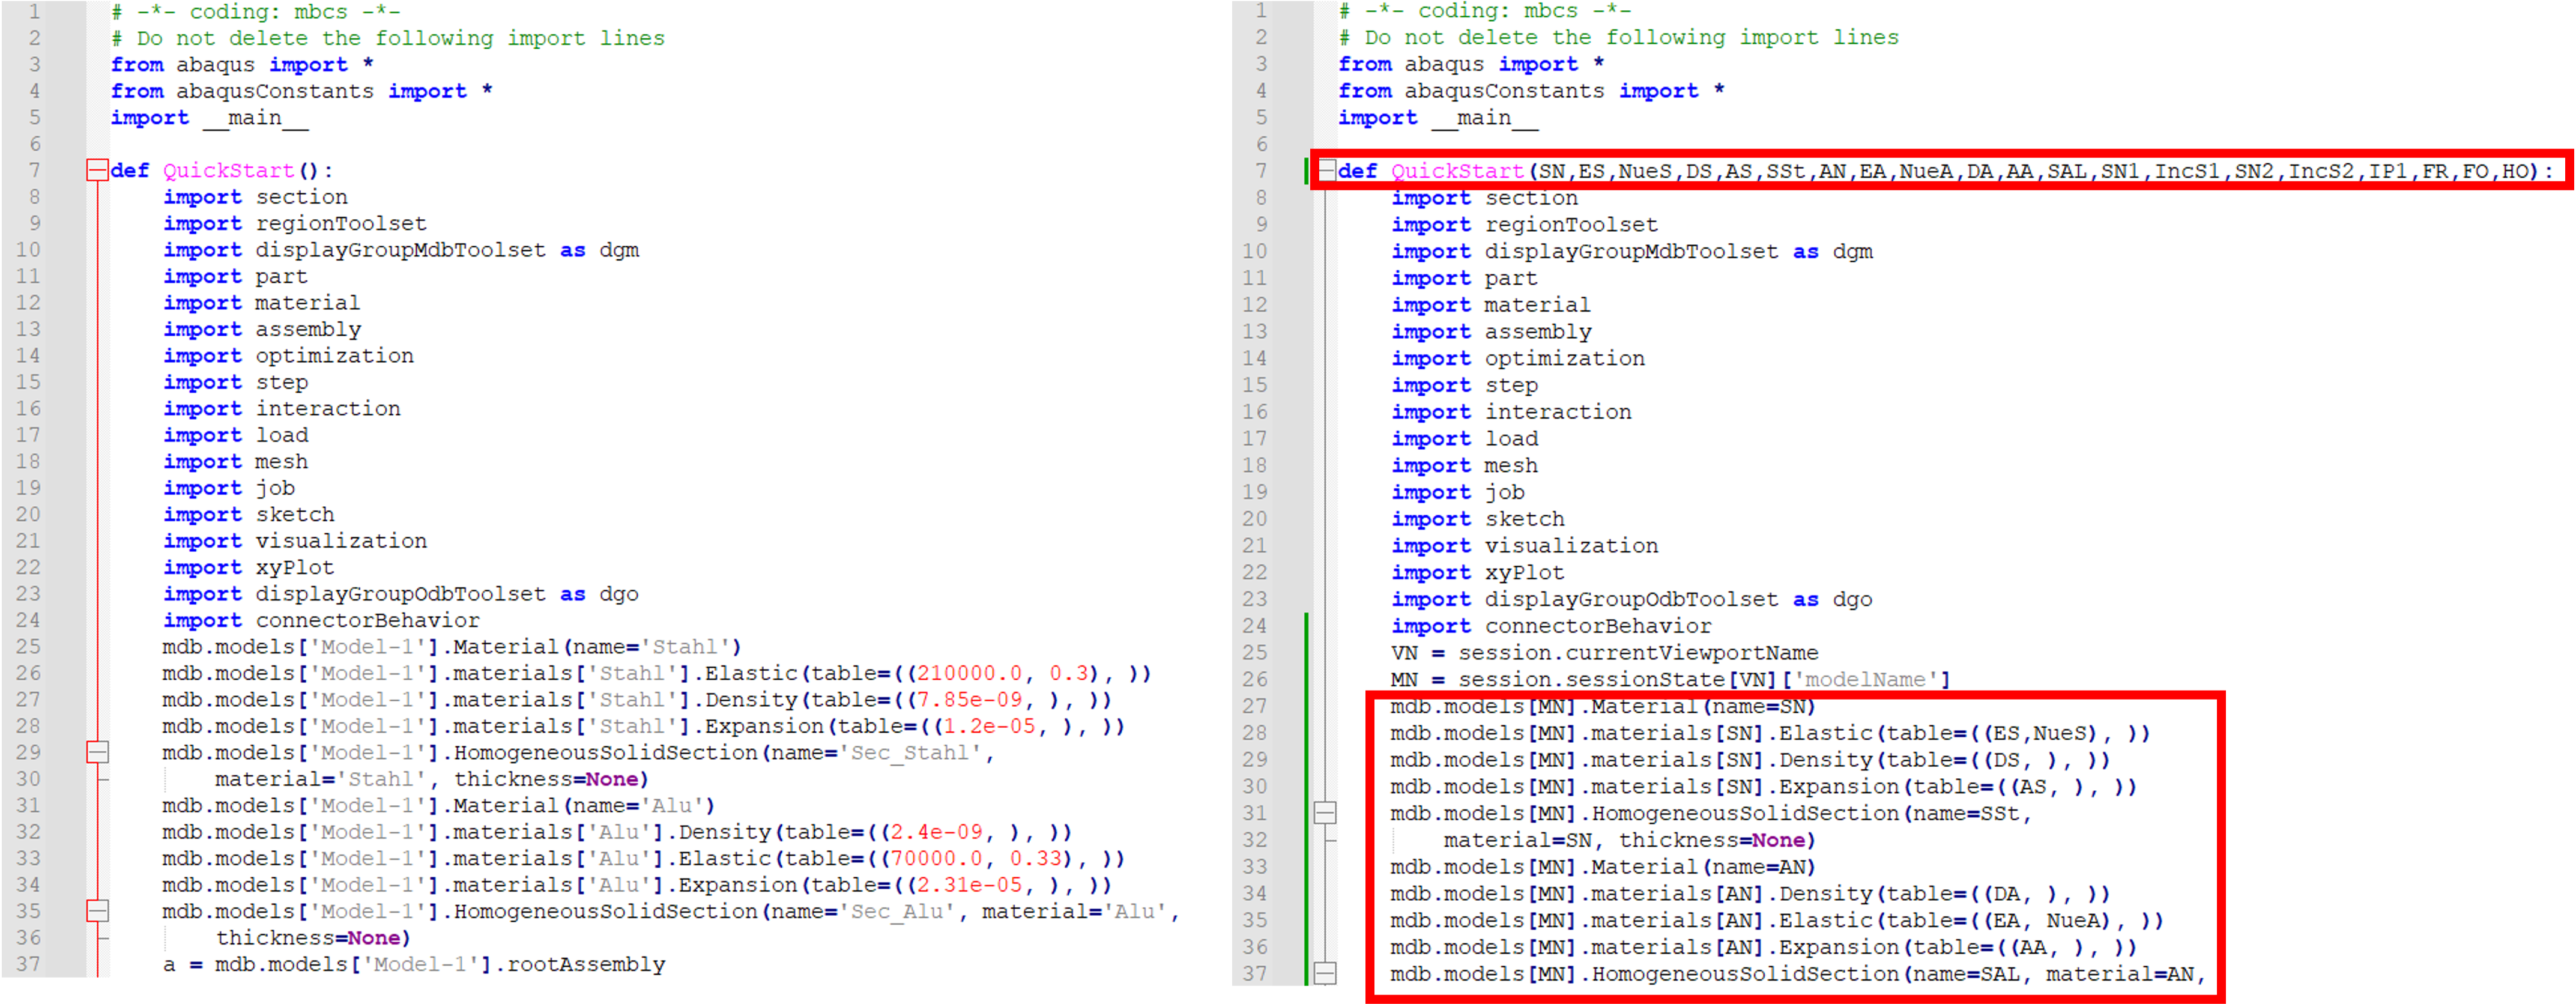
It serves to simplify the scripts if you use placeholders. Here we introduce a placeholder for the currently used window in Abaqus/CAE (called viewport) and the model. When starting Abaqus/CAE without calling an existing .cae file, these are usually ‘Viewport: 1’ and ‘Model-1’.
If you add the two lines
- VN = session.currentViewportName
- MN = session.sessionState[VN][‘modelName’]
to the script as shown in the picture, then you can replace all further occurrences of ‘Viewport: 1’ with VN and all occurrences of ‘Model-1’ with MN. If you used a different model name or opened another viewport before you started the MacroRecorder, please replace accordingly.
Now the variables should be added to the script.
In a first step, all variables are to be passed when calling the function. To do this, insert the above line with the variables into the empty parenthesis after def QuickStart().
Then all entries of the variables in the script are replaced by the variables themselves. So, here, in the picture below the model name ‘Model-1’ by MN, the name ‘Steel’ by SN, ‘Alu’ by AN, the values of the E-moduli by the variables ES and EA, and so on.
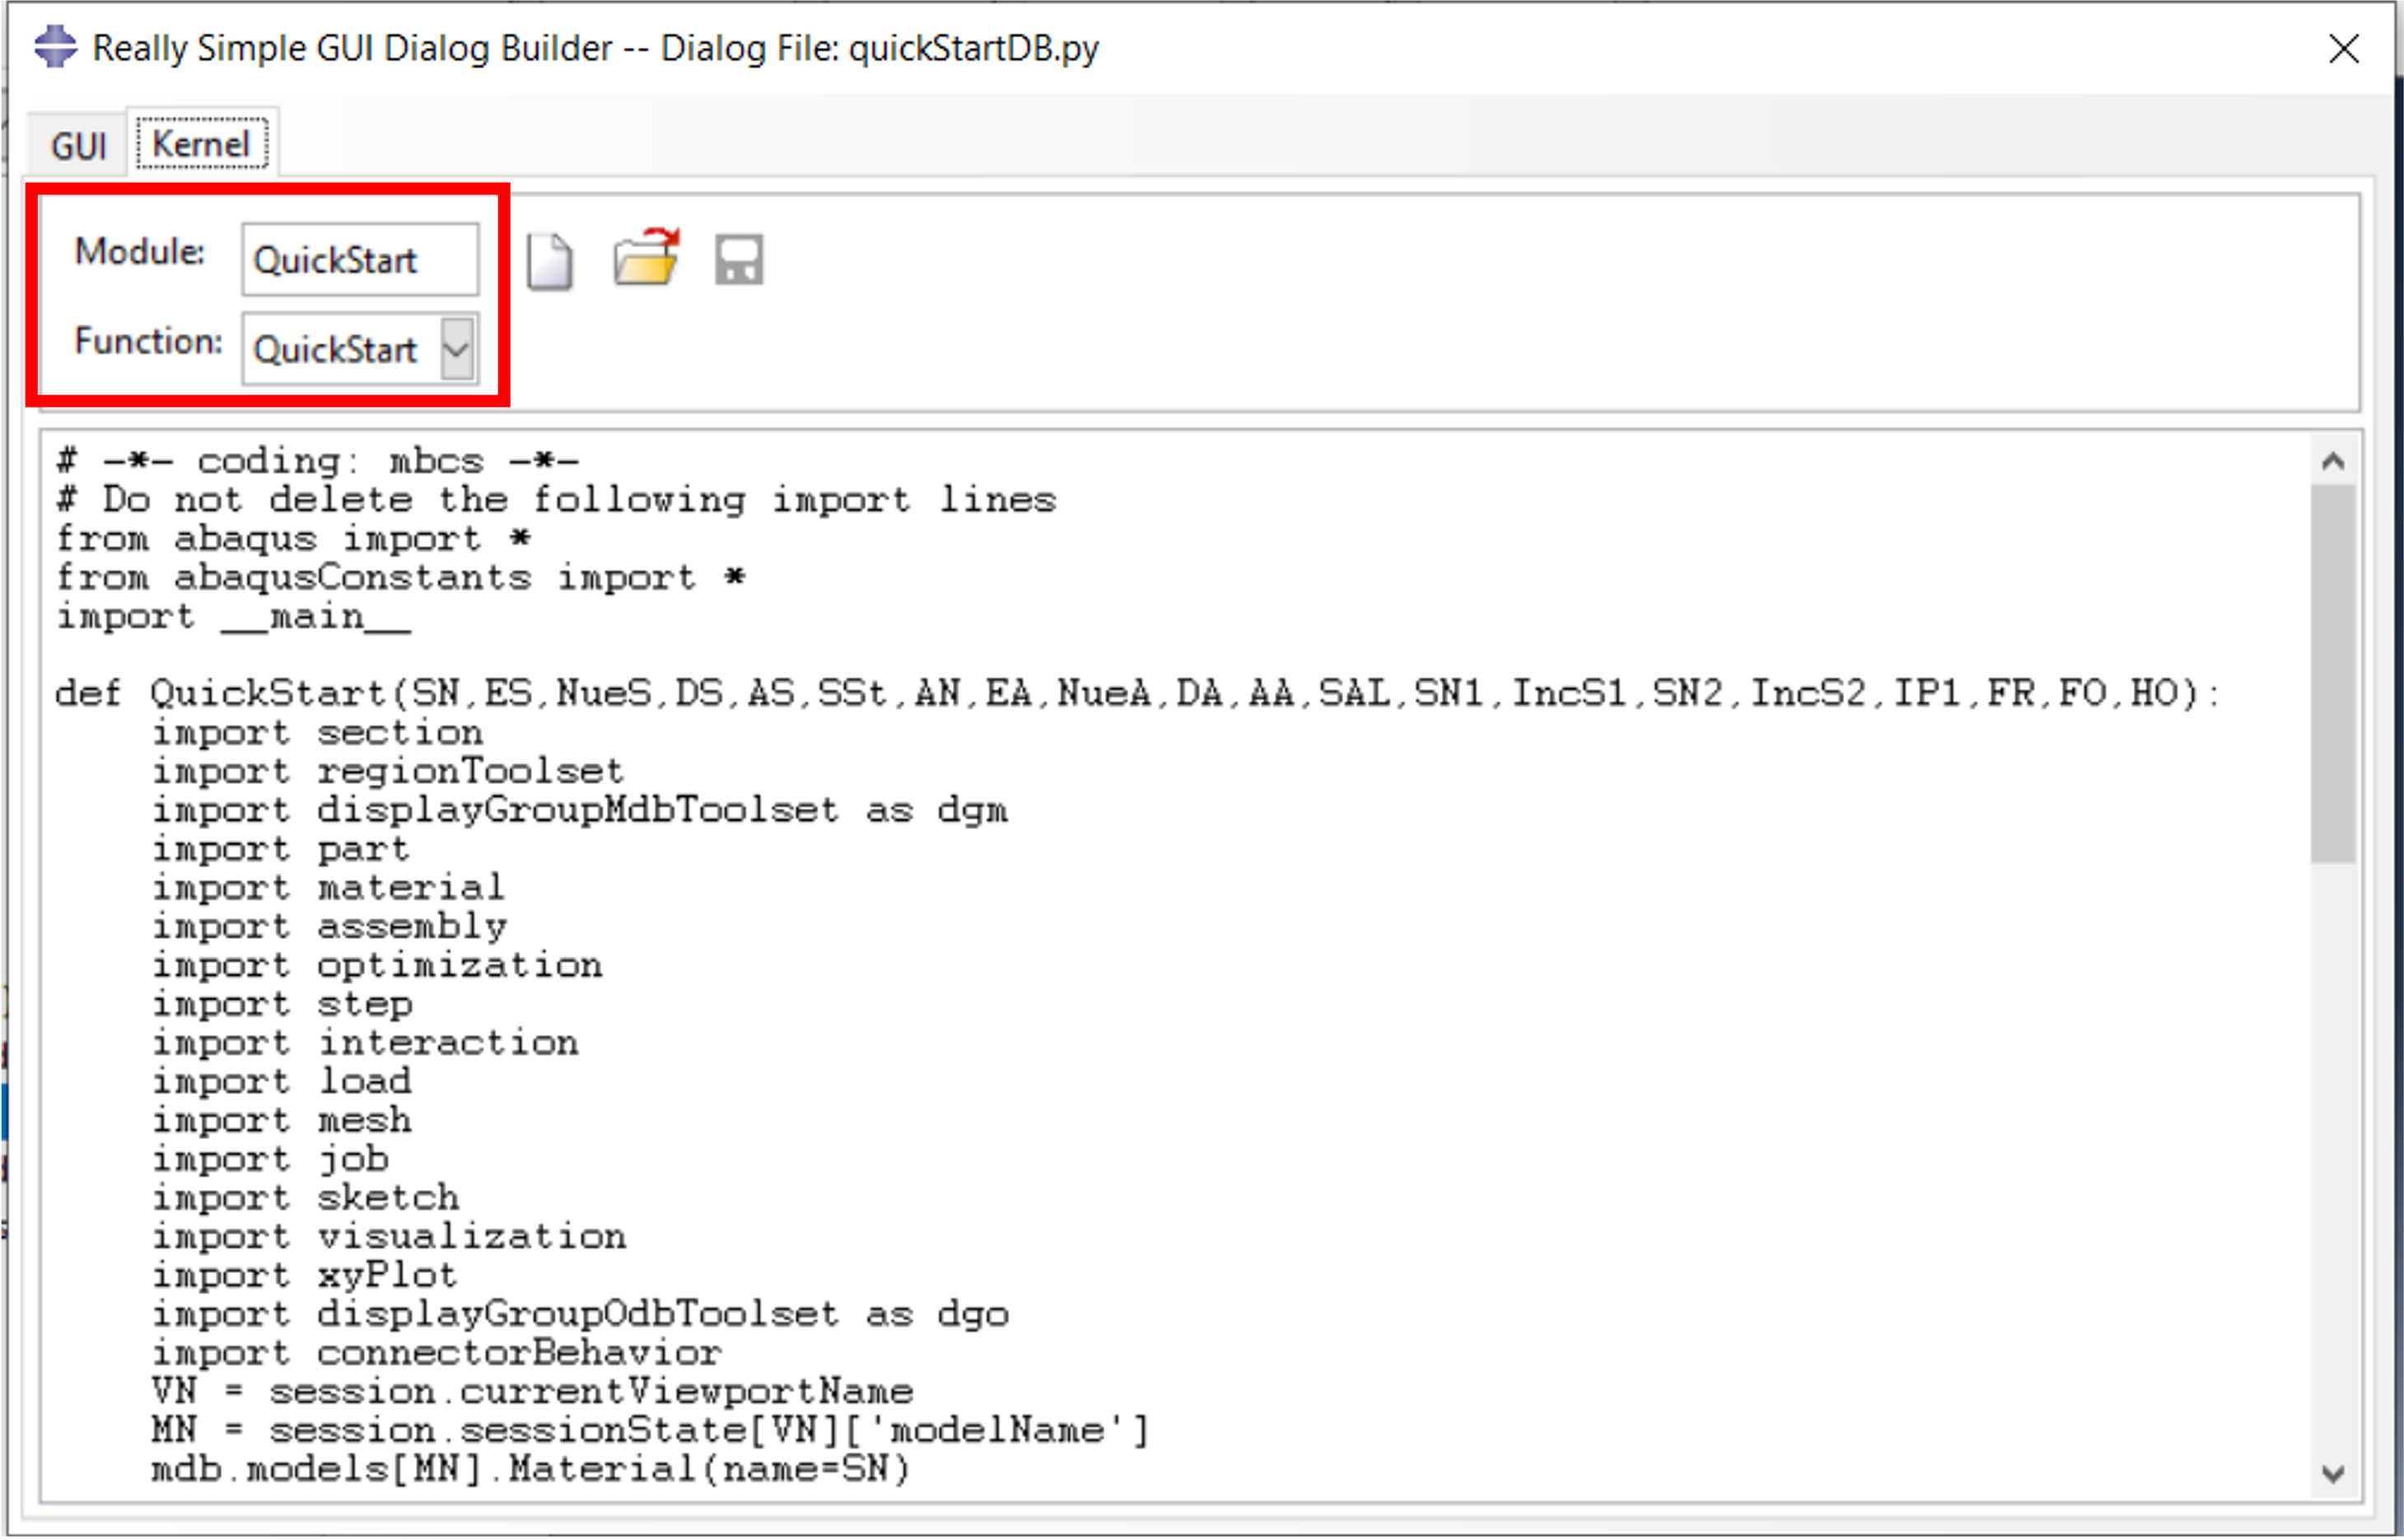
Now the finished script is inserted in the RSG Dialog Builder in the Kernel tab via the Open file function. Here, the Modules field is filled in automatically, but the function must be selected, since scripts can basically contain multiple function definitions.
It is recommended that while working on your own QuickStart plugin, you save it in the working directory. Thus, the plugin is only loaded when Abaqus is started from this working directory.
Only the finished plugin should then be saved so that it is always loaded when Abaqus is called. This is the case in 2 places.
If you save the plugin in the home directory of a user, the plugin will be loaded for this user every time Abaqus is called.
But there is also the possibility to store the plugin in a central directory for multiple users. This central directory is defined in the abaqus_v6.env file via the entry
plugin_central_dir=”C:\Simulia\CAE\plugins20″
. Here the directory is used, which is set up by default during the installation. The abaqus_v6.env file is located in a user’s home directory or working directory. The entry can also be made centrally for multiple users in the case of central installations. But more about this in a separate wiki.
You should save intermediate states of the creation of your own QuickStart plugin in the working directory. If you want to continue working on an intermediate state, use the File Open dialog to load the intermediate state into the RSG Dialog Builder.
In the manual, one searches in vain for an introduction to the RSG Dialog Builder. A short introduction can be found in the RSG Dialog Builder via the Alarm Clock button, which is located directly under the GUI tab.
RSG Dialog Builder in interaction with Macro Recorder offers the possibility to create dialogs for a more efficient working with Abaqus/CAE. For this, extensive knowledge of customization and scripting with Python is not necessary.
Here, we have shown how to create a script with little effort, which can perform recurring definitions at the beginning of a new model in Abaqus/CAE with one click.
We will be happy to assist you in creating your QuickStart plugin. Get in contact with us.
In part, this text and illustrations shown are based on research of evaluated literature. If this is the case, the sources are marked in the text by a number, e.g. [2], and the source is listed here.
In part, however, the sources listed here should simply be understood as recommendations for further reading.
